

Quick Answer: To create a WordPress blog, buy hosting (Hostinger Premium starts at ~$2.99/month), register a domain, run the one-click WordPress installer in hPanel, pick a lightweight theme like Kadence, install six essential plugins, and publish your first post. Total setup time: under 90 minutes. No coding required.
Who this guide is for: This is the technical setup guide for creating a self-hosted WordPress blog from scratch — domain, hosting, install, theme, plugins, settings, speed, and SEO foundations. If you want the full strategy, niche selection, content plan, and monetization roadmap, read the companion guide: How to Start a Blog and Make Money.
I’ve helped set up 500+ client websites since 2017, hosted 25+ self-hosted projects on Hostinger personally, and spent real money testing 20+ hosting providers. What follows is the exact technical process I use every single time — nothing skipped, nothing inflated.
What “Self-Hosted WordPress” Actually Means
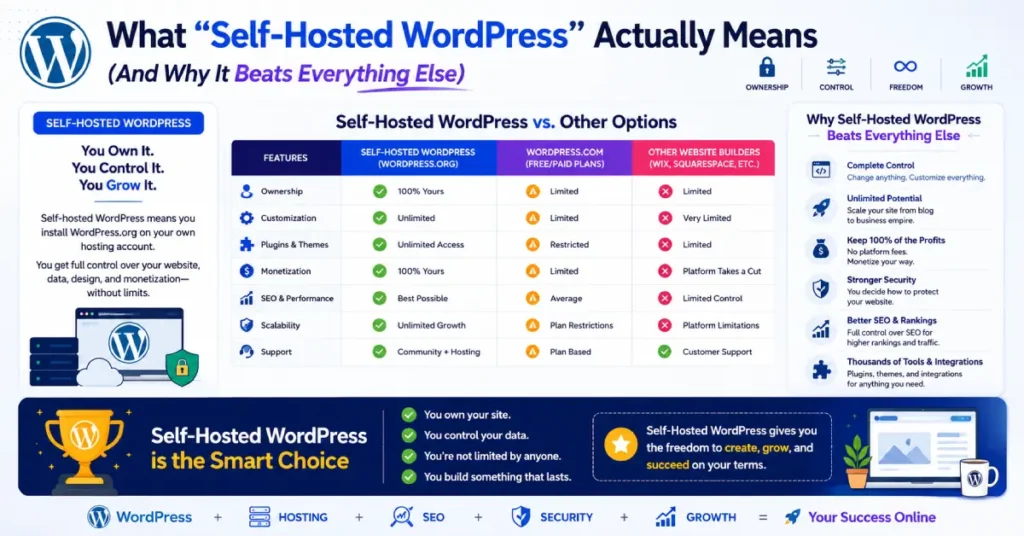
Self-hosted WordPress means you install the free WordPress.org software on hosting you control. This is different from WordPress.com, Wix, Medium, or Substack — platforms that own your data, restrict your plugins, and can delete your account without warning.
In 2021, a Medium publication I’d built to 6,000+ followers was suspended overnight. Two years of content, gone. That experience permanently shaped how I advise anyone building a content business: you must own your infrastructure.
Here’s what self-hosted WordPress gives you that hosted platforms don’t:
| Feature | Self-Hosted WordPress.org | WordPress.com / Hosted Platforms |
|---|---|---|
| Full theme freedom | Yes — 12,000+ themes | Limited; paid plans needed |
| All plugins (Rank Math, WPForms, etc.) | Yes — 60,000+ | Business plan only |
| Custom domain | Yes, from day one | Paid upgrade |
| Monetise with any ads or affiliates | Yes, no restrictions | Restricted or banned |
| Own your data and files | Yes — full control | Platform owns the account |
| First-year cost (approx.) | $35–$120 | $0–$300 with limits |
WordPress.org powers over 43% of all websites globally. It’s the platform used by serious bloggers, agencies, and Fortune 500 content teams alike. When you learn how to create a WordPress blog website the self-hosted way, you’re building on the same foundation.
What You Need Before You Start
No drama here. The complete list:
- A topic you can write 50+ articles about without running dry
- A domain name (free with annual Hostinger hosting)
- A hosting account (~$35–$60 for your first year)
- An email address
- 90 minutes for the initial setup
No coding skills. No server knowledge. No technical background. If you can send an email, you can run a self-hosted WordPress blog.
How Much Does It Cost to Create a WordPress Blog in 2026?
The honest number: $35–$60 for year one if you use free themes and plugins. Here’s the current breakdown based on verified Hostinger pricing (September 2026):
| Cost Item | Free/Cheap Path | Recommended Path | Premium Path |
|---|---|---|---|
| Web hosting (Hostinger, 12 months) | $35.88 (Premium) | $53.88 (Business) | $119.88 (Cloud Startup) |
| Domain name | Free with hosting (year 1) | Free with hosting (year 1) | Free with hosting (year 1) |
| SSL certificate | Free (included) | Free (included) | Free (included) |
| WordPress software | Free | Free | Free |
| Theme | Free (Kadence, Astra) | $59–$99 (GeneratePress Pro) | $129–$299 (premium) |
| Essential plugins | Free | Mostly free, $49 for one premium | $200+ premium |
| First year total | ~$36 | ~$110–$160 | ~$320+ |
One thing hosting articles never tell you: Hostinger’s introductory pricing is for 12–48 months. Renewal jumps to $12.99/month for Premium and $18.99/month for Business. Lock in 48 months upfront if you can. The math favours it heavily — roughly $144 over four years versus $600+ at month-to-month renewal.
For a full hosting comparison with real benchmark data, see: Best WordPress Hosting 2026 – Fast, Secure & Affordable Plans
Step 1: Choose Your Domain Name
Your domain is your blog’s address. Here are the rules I use with every client:
- Under 15 characters when possible — shorter is more memorable on mobile
- Use .com if available — it still carries the highest brand credibility
- No hyphens, numbers, or creative spellings — they confuse and look spammy
- Brand-style names age better than niche-locked ones (e.g.,
yourname.comoutlastsbestketo tips.com) - Say it out loud — if it’s awkward, change it
Don’t let domain indecision delay your launch. The domain matters far less than the content published on it. I’ve seen awful domain names rank #1 for competitive terms because the content was exceptional.
When you sign up for Hostinger’s Premium plan or higher, a domain is free for the first year. That’s the simplest path. If you want to compare registrars first, see: Best Domain Registrars in India 2026
Step 2: Sign Up for Hostinger Hosting
Go to Hostinger and select Premium Web Hosting or WordPress Premium (functionally identical at this tier).
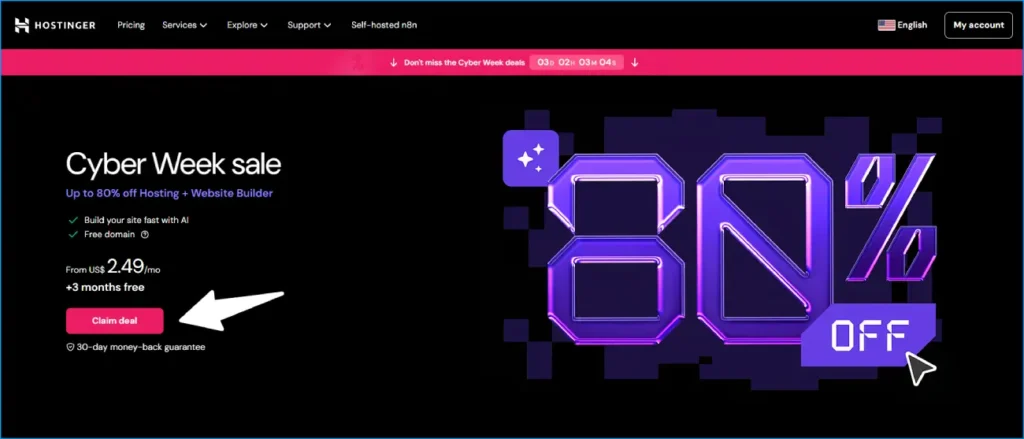
Why Hostinger specifically? I’ve run 25+ self-hosted projects on it over seven years, and tested 20+ hosts with real money. The reason it’s my default:
- LiteSpeed servers — faster TTFB than Apache-based stacks most budget hosts use (my testing puts Hostinger’s TTFB at ~223ms)
- Free SSL + free domain on annual plans
- hPanel — a cleaner dashboard than traditional cPanel, especially for first-timers
- One-click WordPress installer that actually works in 90 seconds
For Indian users: Best Web Hosting in India 2026 covers INR pricing and UPI payment options, with Hostinger India as the top pick.
For broader comparison: 11 Best Web Hosting Services 2026 – Tested & Reviewed
During signup — what to buy, what to skip:
✅ Domain WHOIS privacy — worth it. Hides your name, address, and email from public WHOIS lookup. Without it, your contact info is searchable by anyone.
❌ Email marketing add-ons, AI tools, priority support — skip at signup. Upsells designed to bump cart value. Add later only if you have a specific need.
After payment, Hostinger sends a confirmation email and drops you into hPanel. Bookmark the hPanel URL — it’s your control centre for everything.
To save extra: I keep verified Hostinger coupon codes updated monthly. The code MANIPATHAK typically adds an extra 7–10% off the public price. See: Hostinger Coupon Codes 2026
Step 3: Install WordPress on Hostinger (One Click, ~90 Seconds)
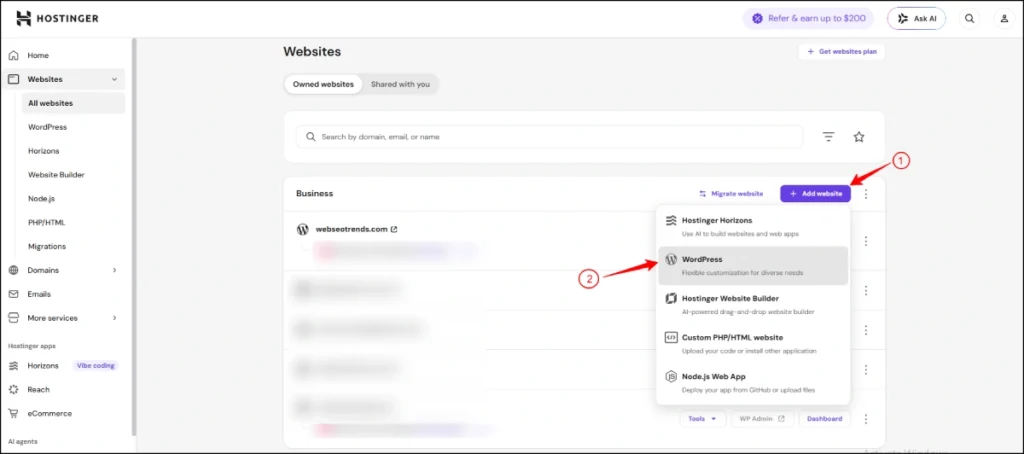
From inside hPanel:
- Click “Set Up” on your hosting plan card
- Choose “WordPress” as the platform
- Enter your blog title (changeable later), an admin username (skip “admin” — brute-force bots target it first), and a strong password
- Enter your admin email
- Click “Install”
WordPress installs in roughly 90 seconds. Your dashboard URL will be yourdomain.com/wp-admin. Save your login credentials in a password manager immediately. Resetting a forgotten WordPress password through email recovery on day one is an avoidable headache.
Hostinger installs the latest stable WordPress release automatically. Minor version update prompts will appear in your dashboard after launch — accept them within a week of release for security.
Step 4: Activate Your Free SSL Certificate
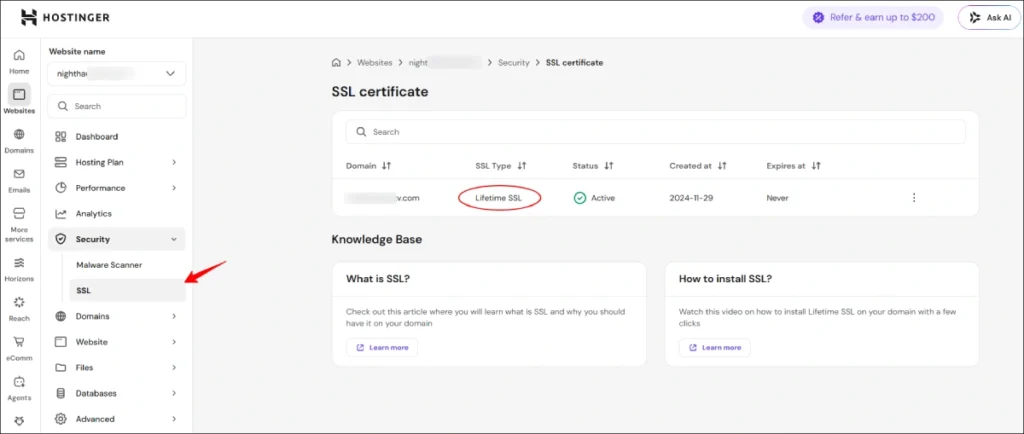
SSL is the padlock icon next to your URL that turns http:// into https://. Without it, browsers display a “Not Secure” warning and Google downgrades your rankings. This is a non-negotiable first step before you do anything else.
In hPanel: Websites → Manage → SSL → Install SSL → select Free Let’s Encrypt SSL (auto-activates in a few minutes)
In WordPress: Settings → General → update both WordPress Address and Site Address to https://
Takes two minutes. One of the highest-leverage small wins available on a new blog.
Step 5: Choose a Fast, Lightweight Theme
The theme mistake most new bloggers make is optimising for “looks impressive in the demo” instead of speed and Core Web Vitals. Heavy themes kill rankings regardless of how good your content is.
My recommended themes for new WordPress blogs in 2026:
- Kadence (free or Pro) — My default for most new blogs. The free version is genuinely capable. Pro adds advanced header/footer builders for ~$59/year. Starter templates cover most niches.
- GeneratePress — Best alternative for minimal, developer-friendly sites. Pro version ~$59/year.
- Astra — Strong if you plan to use Elementor. Free version works; paid ~$59/year.
- Blocksy — More design-forward feel. Free version is solid.
What I don’t recommend: Heavy multipurpose ThemeForest themes, or Divi for a beginner blog. They look spectacular in demos and load like dying hardware when you run Core Web Vitals against them.
To install: WordPress dashboard → Appearance → Themes → Add New → search for “Kadence” → Install → Activate. Most modern themes include a starter template wizard. Pick one, customise colours and logo, then stop. Do not spend three weeks on design before publishing a single post. I’ve watched bloggers lose six months to “design polish” before writing anything.
Step 6: Configure WordPress Settings Correctly
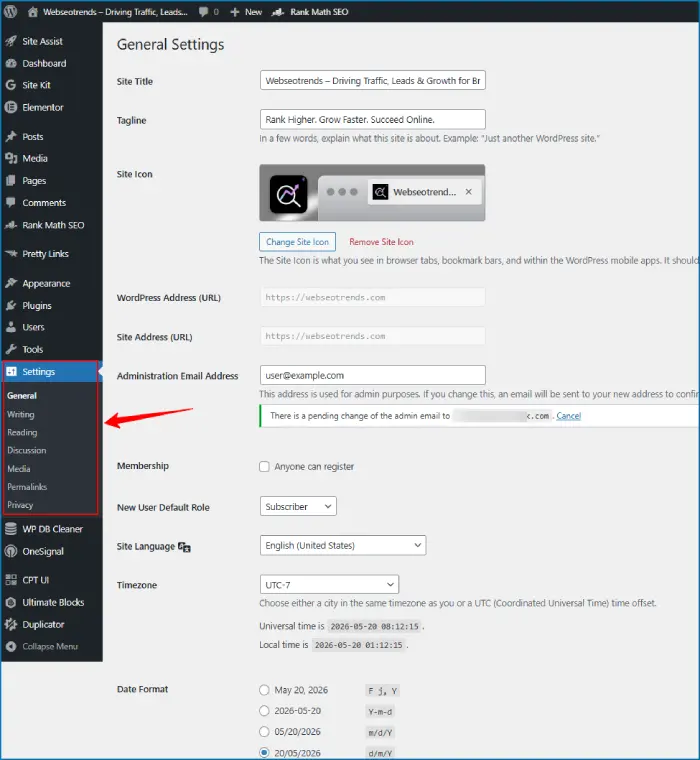
This section gets skipped in most guides. That’s a mistake, because fixing misconfigured settings on a live, indexed blog is genuinely painful.
Work through these in order:
Settings → General Set your Site Title, Tagline, timezone (your actual location), and readable date format.
Settings → Reading For a blog, keep the default “Your latest posts” as homepage. Leave this alone until you have a clear reason to change it.
Settings → Permalinks ← Most important setting on this page Change from “Plain” to “Post name.” Your URLs should be yourdomain.com/post-title/ not yourdomain.com/?p=123. Post Name structure is the SEO-correct choice. Changing this after your blog is indexed breaks every link you’ve built — get it right now.
Settings → Discussion Decide whether to enable comments. I leave them on but disable “Allow link notifications from other blogs (pingbacks and trackbacks)” — they’re spam magnets.
Users → Profile Change your display name to something other than your admin username. Brute-force bots scrape WordPress page source for usernames. Different display name = one less attack vector.
Settings → Privacy Generate a privacy policy from the built-in template. Edit placeholders. You legally need one in most countries.
Step 7: Install the Essential Plugins (Six Is Enough)
Plugins are WordPress’s superpower and its most common performance killer. The mistake new bloggers make is installing 30 on day one, creating speed problems and conflicts they can’t diagnose.
Here’s the exact six-plugin stack I install on every new blog:
1. Rank Math SEO
My go-to over Yoast for new blogs. The free version handles on-page SEO scoring, schema markup, XML sitemap generation, and Search Console integration. Cleaner interface, more features at the free tier. See Best On-Page SEO Tools 2026 for a full comparison.
2. LiteSpeed Cache
If you’re on Hostinger (LiteSpeed servers), this is the correct caching plugin. It’s free and pairs natively with Hostinger’s infrastructure for maximum performance. If you ever migrate to a non-LiteSpeed host, switch to WP Rocket.
3. WPForms Lite
Every blog needs a working contact form. WPForms Lite handles it cleanly, for free.
4. UpdraftPlus
Free backup plugin. Configure it once to back up to Google Drive or Dropbox on a weekly schedule. I’ve used UpdraftPlus to restore at least 12 client sites from disasters — plugin update breakages, database corruption, hacks. It costs nothing and saves everything.
5. Site Kit by Google
Connects WordPress directly to Google Analytics 4, Search Console, and PageSpeed Insights in one dashboard. Free. Install before your first post is live so you’re tracking data from day one.
6. Wordfence Security (free)
Basic firewall and login protection. The free version is sufficient for new blogs. Upgrade to paid when you start getting real traffic.
That’s six plugins. Stop there for the first three months. Add more only when you hit a specific problem none of these solve.
Step 8: Create Your Four Core Pages
Before publishing your first post, build these four static pages. They rarely change but they’re legally required in most jurisdictions and they build the trust signals Google looks for (E-E-A-T: Experience, Expertise, Authoritativeness, Trustworthiness).
About Page Who you are, why you started this blog, what the reader will learn. Include a real photo — faces build trust, and Google’s systems use them as an E-E-A-T signal. Don’t make it corporate. Write it like you’d explain your blog to someone at a coffee shop.
Contact Page WPForms contact form plus an email address. Make it genuinely easy to reach you.
Privacy Policy Already generated in Step 6. Edit the placeholders with your real business name and contact info.
Disclosure / Disclaimer Page If you plan to use affiliate links or accept sponsored content, this is legally required in most countries. Free templates are widely available.
To publish a page: WordPress dashboard → Pages → Add New → write the content → Publish. To add it to navigation: Appearance → Menus → drag page into your primary menu.
Step 9: Write and Publish Your First Blog Post
Go to Posts → Add New. Give it a title, write your content in the block editor, add a featured image, select a category, set the URL slug, and hit Publish.
Before you publish, run through this checklist:
Write three posts before publishing any. The first post you write will almost certainly be your worst. Write three, improve the first one, then launch. This single habit eliminates 90% of the “cringe at my early work” problem.
Target one specific keyword per post. Every post should answer a real question people type into Google. Use Google Search Console after setup to find what people search for. For early-stage keyword research, check out How to Find Low Competition Keywords That Actually Rank.
Keyword placement basics (Rank Math will score these):
- Title (primary keyword, near the start)
- First 100 words (natural mention)
- At least one H2 subheading
- URL slug
- Meta description (Rank Math field in each post)
- Image alt text (where relevant)
Use H2 and H3 headings to break up the text. Walls of text kill mobile readability. H1 is your post title (handled automatically). H2 for major sections. H3 for sub-sections.
Add a featured image. Every post needs one. Free stock from Unsplash or Pexels works. Compress before uploading — 200KB or under per image.
Set a clean URL slug. WordPress defaults the slug to the full post title. Edit it down to the keyword phrase. For a post titled “How to Create a WordPress Blog in 2026: The Honest Guide,” the slug should be /how-to-create-a-wordpress-blog/ — not the full sentence.
After publishing: open the post in a private browser tab to see it exactly as a reader would. Fix anything broken before moving on.
Step 10: Submit Your Sitemap to Google Search Console
This is the step most new bloggers skip — and it costs them three months of traffic.
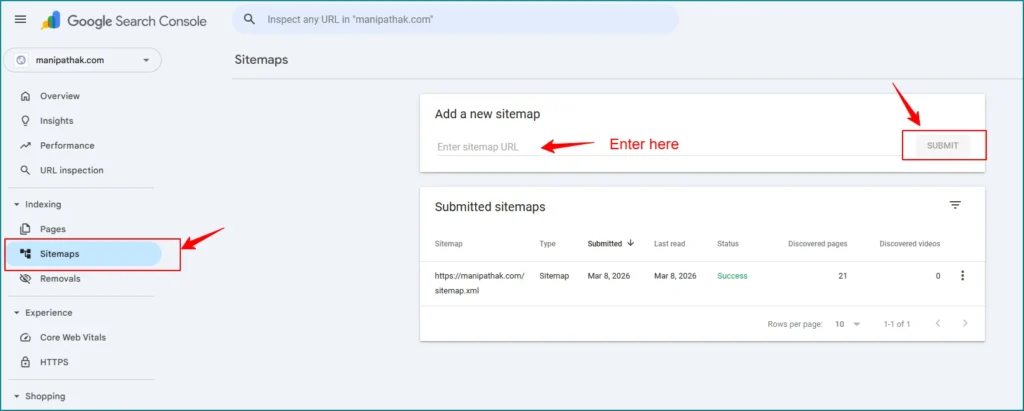
Rank Math automatically generates your sitemap at yourdomain.com/sitemap_index.xml.
Submission steps:
- Go to Google Search Console
- Add your blog as a property
- Verify ownership — Site Kit by Google handles this in two clicks from your WordPress dashboard
- Click Sitemaps in the left menu
- Enter your sitemap URL and click Submit
Without this step, you’re waiting for Google to discover your blog through external links — which can take months for a new site with no link profile. Sitemap submission takes five minutes and dramatically speeds up indexing.
For a deeper walkthrough: How to Submit Your Website to Search Engines in 2026
How to Speed Up Your WordPress Website
Page speed is a direct Google ranking factor. Core Web Vitals (LCP, INP, CLS) are explicit ranking signals as of 2026. A slow blog will not rank consistently regardless of content quality.
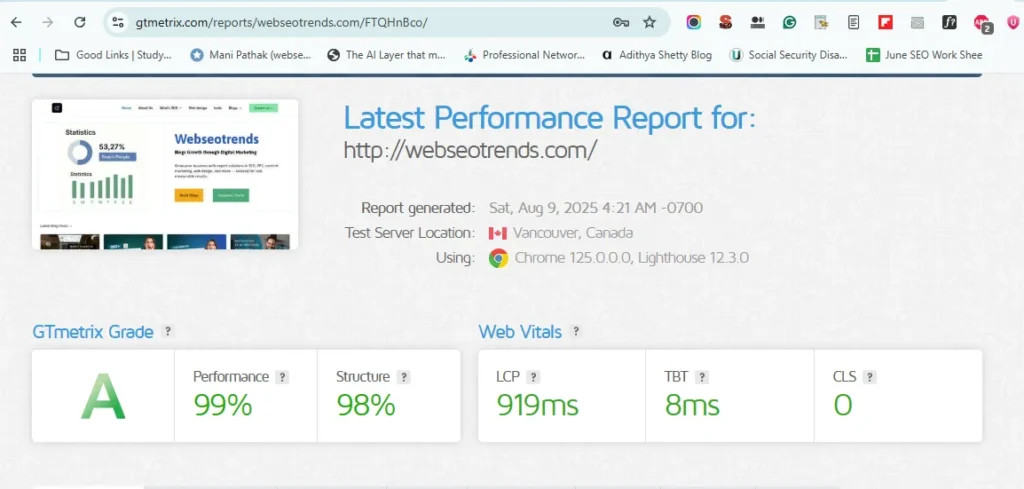
Speed wins ranked by impact:
1. Configure LiteSpeed Cache properly Enable page caching, browser caching, GZIP compression, and image lazy loading. A properly configured LiteSpeed Cache install can reduce load time by 40–60% on Hostinger’s servers.
2. Compress images before upload Target under 200KB per image. Use Squoosh (free, browser-based) to compress before uploading. A 2MB image on a blog post is indefensible in 2026.
3. Choose a lightweight theme Covered in Step 5. A slow theme cannot be fixed with plugins.
4. Limit active plugins Every active plugin adds database queries and load. Deactivate and delete anything unused.
5. Use Cloudflare’s free CDN Hostinger integrates Cloudflare natively. Activating it adds a content delivery network that serves your blog faster to visitors anywhere in the world.
6. Run PageSpeed Insights monthly Go to pagespeed.web.dev, paste your homepage URL, and identify your top three slowdowns. Fix them one by one.
Target thresholds (Google’s “Good” tier):
- Load time under 2 seconds on mobile
- LCP under 2.5 seconds
- INP under 200ms
- CLS under 0.1
How to Add SEO Keywords in WordPress Content
The misconception: that you “add keywords” somewhere in WordPress settings. You don’t. Keywords live in your content.
The correct on-page keyword routine for every post:
- Title — primary keyword near the start
- URL slug — short, keyword-focused, no stop words
- First 100 words — natural mention of the primary keyword
- At least one H2 — includes the keyword or a close variation
- Meta description — Rank Math’s field in every post editor; include keyword, under 160 characters
- Image alt text — relevant where it fits naturally; don’t stuff
- Internal link anchor text — when linking to this post from others, use keyword-relevant anchors
That’s the complete on-page routine. Rank Math’s post scorecard monitors all of this and flags gaps. Use it as a checklist, not a religion.
For a full keyword strategy including density targets and competitive research: SEO Content Writing: How to Write SEO Content That Ranks
For technical SEO beyond on-page: WordPress SEO Services – From Page 2 to Position #1
How to Back Up Your WordPress Website
Back up before you think you need to. A client’s booking site went down on a Friday evening after a plugin update broke their database — no backup existed. They lost a weekend’s bookings and spent a week rebuilding. Avoidable.
UpdraftPlus setup (free):
- Install UpdraftPlus from the plugin directory
- Go to Settings → UpdraftPlus Backups → Settings
- Set schedule: weekly for most new blogs; daily if you publish daily
- Connect remote storage: Google Drive is the easiest free option
- Save settings, then run one manual backup immediately to confirm it works
Hostinger’s Business and Cloud plans include automatic backups as well. Use both — they’re free and they save you in disasters.
How to Edit Your WordPress Website (The Parts Nobody Explains)
After setup, you’ll work in three main areas:
Posts and Pages Open any post or page, edit in the block editor, click Update. The block editor (Gutenberg) uses drag-and-drop content blocks. An hour of experimentation makes it intuitive. WordPress’s own Block Editor documentation is genuinely useful for specific questions.
Appearance → Customize (or Site Editor for block themes)
Controls global site colours, fonts, header, footer, sidebar, logo, and layout defaults. Most theme settings live here.
Appearance → Widgets and Menus
Widgets control what appears in sidebars and footers. Menus control your top navigation. Both are drag-and-drop.
Changing a post’s URL after it’s indexed: Use Rank Math’s built-in redirect manager. It sets up the 301 redirect automatically so you don’t lose SEO equity.
If you break something visually: Switch temporarily to the default Twenty Twenty-Four theme. This isolates whether the problem is your theme or your content — useful for fast troubleshooting.
How to Check Your WordPress Website Traffic
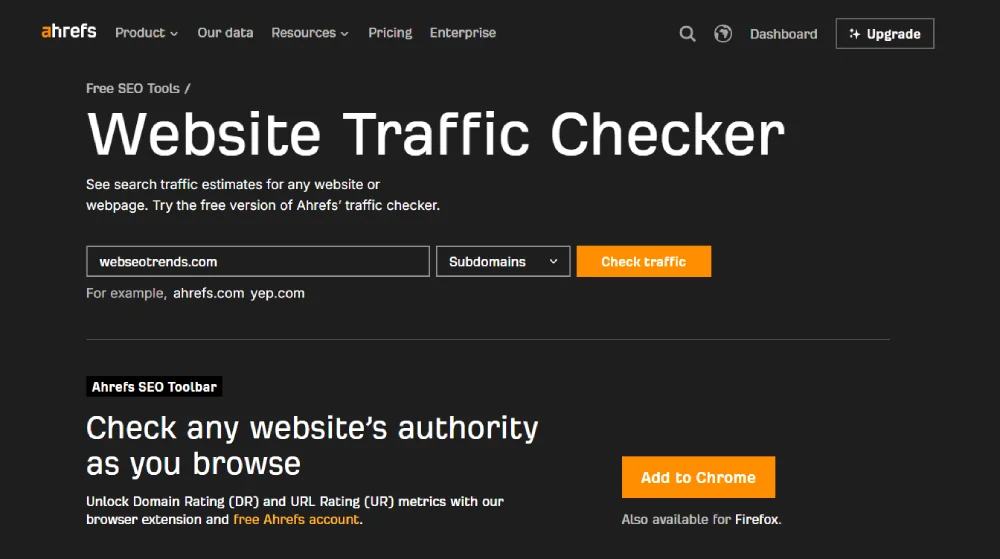
Three free tools cover 95% of what new bloggers need:
Google Search Console Which search queries send people to your blog, your ranking positions, click-through rates, which pages get clicks. This is the most important SEO tool for a new blog. Check it weekly.
Google Analytics 4 Total visitor count, traffic sources (organic, social, direct, referral), session duration, and top pages. Site Kit by Google connects this to your WordPress dashboard. Check monthly — daily traffic obsession is a productivity killer in months 1–3.
Site Kit by Google Aggregates Search Console, Analytics, and PageSpeed Insights into one WordPress dashboard panel.
Common Mistakes That Kill New WordPress Blogs
I’ve watched these patterns repeat across hundreds of new blogs:
Picking a niche that’s too broad. “Lifestyle” is not a niche. “Slow living for remote workers” is a niche. Specificity wins in both SEO and audience-building.
Installing 30+ plugins on day one. Every plugin adds load time and a potential conflict vector. Start with six. Add more only when you have a specific problem.
Three weeks on theme design before publishing anything. This is procrastination dressed as productivity. Ship the imperfect blog. Improve it as you go.
Skipping keyword research. Writing whatever you feel like is fine for a personal journal. For a blog you want to rank, every post needs a researched keyword target. Otherwise you’re writing into a void. See: How to Find Low Competition Keywords That Actually Rank
No backups before the first plugin update. Already covered above. Five minutes in UpdraftPlus is the entire fix.
Publishing once and waiting for traffic. SEO compounds over time. Most new blogs see meaningful organic traffic between months 6 and 12, after 25–50 well-targeted posts are live. Stop checking analytics daily in month one. Publish.
Not building an email list from day one. Your email list is the one audience Google can’t deprioritise. Set up a free account with MailerLite or EmailOctopus and add a signup form before your second post.
Using the admin username “admin.” Brute-force bots scan for it constantly. Choose a unique username during Step 3 and never change it back.
WordPress.com vs WordPress.org: The Final Word
For anyone still uncertain:
WordPress.org = free open-source software you install on your own hosting. You own everything, control every setting, and can install any theme or plugin. This is what this guide covers.
WordPress.com = a hosted service run by Automattic. The free tier shows their ads on your site, restricts plugins, blocks custom domains, and limits monetisation. The higher paid tiers remove restrictions — but cost as much or more than self-hosted and give you less control.
For any blog with a serious future, self-hosted WordPress.org on Hostinger is the right choice.
90-Day Publishing Plan After Your Blog Goes Live
Launching is one thing. Knowing what to do in the first 90 days is what separates blogs that grow from blogs that stall.
Days 1–7: Publish 3 articles. Configure Search Console, Analytics, Rank Math. Submit sitemap. Tell 5 people you launched.
Days 8–30: Publish 5 more articles (you’re at 8 total). Each should target a specific low-competition keyword. Leave comments on 5 blogs in your niche per week to build early relationships.
Days 31–60: Publish 8–10 more articles (you’re at 16–18). Start tracking which posts are getting impressions in Search Console — even 1 impression is data. Note patterns in what’s getting traction.
Days 61–90: Publish 10 more articles (you’re at ~28). Your first organic clicks should arrive if keyword research was done properly. Go back and improve your earliest 3 posts: better headings, stronger intros, more internal links.
Most new bloggers quit between days 30–60 because “traffic is still slow.” That’s exactly when compounding starts. The blogs that push through this window are the ones that exist in 2 years.
For the complete content and monetization strategy beyond setup — including niche selection, publishing cadence, and how to make your first income online — read the companion guide: How to Start a Blog and Make Money in 2026
How to Create a Blog Page on WordPress (A Blog Section Within an Existing Site)
Many people searching “how to create a blog page in WordPress” or “how to create a blog section in wordpress” aren’t building a standalone blog — they’re adding a blog feed to an existing WordPress website. This is a different setup from a pure blog, and it’s worth explaining exactly.
The scenario: you already have a WordPress website with a homepage, about page, and services page. Now you want to add a “Blog” section where new posts appear. Here’s the exact process:
Step 1 — Create a blank “Blog” page. Go to Pages → Add New. Title it “Blog” (or “Articles” or whatever you prefer). Leave the content area completely empty. Publish it.
Step 2 — Create a blank “Home” page (if you haven’t already). Same process — create a page titled “Home” with no content. Publish it.
Step 3 — Set the blog page in Reading settings. Go to Settings → Reading. Under “Your homepage displays,” select “A static page.” Set Homepage to your “Home” page. Set Posts page to your “Blog” page. Save.
WordPress now routes all blog posts to yourdomain.com/blog/ automatically — no extra plugin needed.
Step 4 — Add the blog page to your navigation. Go to Appearance → Menus. Drag the “Blog” page into your primary menu. Save. Your blog tab now appears in the navigation, answering “how to create a blog tab on wordpress menu” searches exactly.
This single Settings → Reading change is what separates a standalone blog from a blog that lives inside a multi-page website. Every post you write will automatically appear in that feed, creating a blog with multiple posts populating in newest-first order.
How to Create a Beautiful WordPress Blog From Scratch (Design That Doesn’t Kill Speed)
Creating a beautiful WordPress blog from scratch is about good decisions in the first hour, not hours of tweaking later. Here’s the design sequence I run on every new blog:
Typography first. Most modern themes let you set a clean sans-serif body font (Inter, Lato, or Nunito) and a slightly bolder heading font. Set these in Appearance → Customize → Typography. Consistent type alone makes a blog look professional.
Colour palette: three colours maximum. Pick a primary brand colour, a neutral background, and a text colour. Add these to your theme’s Global Colours setting. Don’t use more. Visual noise is the enemy of a trustworthy blog.
Featured images every time. A blog with consistent featured image dimensions (1200×628px is the safe universal size) looks intentional and polished. Use Canva’s blog post template at those dimensions for quick branded images.
White space is design. Generous line spacing (1.7–1.8em), short paragraphs of 2–4 lines, and adequate padding around content are what make the best-looking blogs feel different from cluttered ones. These are all adjustable in your theme’s Customizer without touching code.
Mobile-first check before launch. Open your blog on your phone before publishing anything. If the header looks right, the typography is readable, and the featured image isn’t cropped badly, you’re done with design. More than 60% of blog traffic now arrives from mobile devices.
How to Add a Blog to a WordPress Website That Already Exists
Adding a blog to an existing WordPress website uses the same Settings → Reading approach above, with one addition: you’ll want a clean category structure so the blog section doesn’t look like a dumping ground.
Set up 4–6 categories before publishing your first post. Go to Posts → Categories. Add your main content pillars. Every post must sit in exactly one primary category. This gives the blog section a navigable structure from day one.
Add a blog section link to your existing menu. After completing the Steps → Reading setup above, add the Blog page to your existing navigation menu. Visitors from your services or about pages can now discover your content easily.
Internal link the blog to and from core pages. Add a “Read our latest articles” section or sidebar widget to your homepage that pulls recent posts. This distributes link equity from your existing pages to the new blog content — important for SEO on an established domain.
How to Create a WordPress Blog and Portfolio (or Blog and Online Store)
Two of the most common hybrid builds are blog + portfolio and blog + store. Both run on the same WordPress setup — the difference is in which additional plugin you activate.
Blog + Portfolio on WordPress
For a blog and portfolio WordPress site, the simplest approach uses a free plugin called Portfolio (by Daniel Pataki) or the built-in portfolio post type in themes like Kadence Pro or Astra. Most portfolio workflows involve:
- Activating a “Portfolio” custom post type (via plugin or theme)
- Creating a Portfolio page (similar to the Blog page above)
- Displaying it via a separate menu item
Alternatively, use WordPress’s built-in Pages for portfolio pieces and create a “Work” or “Portfolio” menu item linking to a curated page listing. No extra plugin required.
Blog + Store on WordPress
For a blog and store on WordPress, install WooCommerce (free, from the WordPress plugin directory). WooCommerce adds a Shop page automatically during its setup wizard. Your blog and store then live as separate sections of the same WordPress install — exactly what the search query “how to create a blog and store on wordpress” is looking for.
The only settings note: if your store homepage is your primary page and the blog is secondary, use Settings → Reading to set the static homepage to your shop and the Posts page to your Blog page, as described above.
How to Create a Second Blog on WordPress (Or a Second Blog Page)
Two scenarios come up under “how to create a second blog in wordpress”:
Scenario 1: A second category feed on the same site. You already have a blog at yourdomain.com/blog/. You want a separate “News” feed. The cleanest solution is a dedicated Category page. Create a category called “News,” assign relevant posts to it, and link to yourdomain.com/category/news/ in your menu. This acts exactly like a second blog page without any extra setup.
Scenario 2: A completely separate second blog on a different domain. This requires a separate hosting account (or a second WordPress install on a multisite network). For most users, a separate Hostinger account and domain for the second blog is simpler than WordPress Multisite. Repeat the setup in this guide from Step 1.
How to Create a Blogroll on WordPress
A blogroll is a list of links to other blogs you recommend, typically in a sidebar or footer. WordPress originally had a built-in blogroll/links manager that was disabled in WordPress 3.5. Here’s how to restore or replicate it in 2026:
Option 1 (simplest): Text widget with manual links. Go to Appearance → Widgets → add a “Custom HTML” widget to your sidebar. Write a simple HTML list of links:
<ul>
  <li><a href="https://example.com">Recommended Blog 1</a></li>
  <li><a href="https://example2.com">Recommended Blog 2</a></li>
</ul>
Option 2: Restore the Links manager. Install the free plugin Link Manager by WordPress.com. This re-enables the Links menu in your dashboard, exactly like the original blogroll functionality.
How to Create a WordPress.org Blog vs a WordPress.com Blog
The search “how to create a blog on wordpress.com” and “how to create a blog on wordpress.org” look similar but describe completely different platforms. Here’s the shortest accurate answer:
WordPress.com — hosted by Automattic, free tier available, but: no custom plugins on free/personal plans, ads shown on your site, limited theme options, no full monetisation control. Create an account at wordpress.com and follow their onboarding.
WordPress.org (self-hosted) — the open-source software this entire guide covers. You host it yourself on Hostinger or similar. Full plugin access, no ads, complete ownership. Free to download; you pay only for hosting and domain (~$35–$60/year).
For any blog you intend to grow, monetise, or rank on Google: WordPress.org is the correct choice, every time. The free WordPress.com tier is appropriate only for casual personal journals with no growth ambition.
Frequently Asked Questions About Creating a WordPress Blog
How do I create a WordPress blog as a complete beginner?
Sign up for Hostinger’s Premium hosting plan (~$35 for the first year with a free domain), use the one-click WordPress installer in hPanel, choose a lightweight theme like Kadence, install six essential plugins (Rank Math, LiteSpeed Cache, WPForms, UpdraftPlus, Site Kit, Wordfence), configure permalinks to Post Name, and publish your first article. Total time: under 90 minutes.
How long does it take to create a WordPress blog?
60–90 minutes if you have a domain idea ready. Hosting signup takes 10 minutes. WordPress install takes 90 seconds. Theme setup takes 20 minutes. Plugin setup takes 15 minutes. Your first post can be live in under 2 hours total.
How much does it cost to create a WordPress blog in 2026?
$35–$60 for the first year using Hostinger’s Premium plan with a free domain. Year two renewal runs approximately $150 on annual billing. A premium theme, paid plugins, and an email marketing service can push the total to $150–$300. Most beginners start comfortably under $50.
Can I create a WordPress blog for free?
You can create a free blog on WordPress.com, but with significant restrictions: no custom domain, no plugins, WordPress.com ads on your site, and no monetisation control. Self-hosted WordPress costs ~$35 for year one and removes every restriction. Free hosted blogs make sense only for hobby diaries you have no plans to grow.
Do I need coding skills to create a WordPress blog?
No. WordPress is designed for non-technical users. You install themes and plugins with one click, write posts in a visual block editor, and never touch HTML or CSS for a standard blog. Basic HTML knowledge becomes useful later but is not required to launch.
How do I install WordPress on Hostinger?
Log into hPanel, click Set Up on your hosting plan, choose WordPress as the platform, enter your blog title, admin username, email, and password, then click Install. WordPress is ready in roughly 90 seconds at yourdomain.com/wp-admin.
What is the best theme for a new WordPress blog?
Kadence (free or Pro) is my default recommendation — the free version is genuinely capable, and Pro unlocks advanced layouts for ~$59/year. GeneratePress, Astra, and Blocksy are strong alternatives. Avoid heavy multipurpose themes from ThemeForest for any blog where page speed matters.
How many plugins should I install on a new WordPress blog?
Six at launch: Rank Math SEO, LiteSpeed Cache, WPForms Lite, UpdraftPlus, Site Kit by Google, and Wordfence Security. Adding more than ten plugins on a new blog typically creates speed problems and conflicts. Add more only when you have a specific unmet need.
How do I make my WordPress website rank on Google?
Three components: technically clean setup (fast hosting, SSL, mobile-friendly theme, submitted sitemap), consistently published keyword-targeted content, and patience. Most new blogs see meaningful Google traffic at months 6–12 after publishing 25–50 posts. Skip any service promising first-page results in 30 days.
What is the difference between WordPress.com and WordPress.org?
WordPress.org is the free open-source software you self-host — you own everything. WordPress.com is a hosted service; the free tier runs ads on your site and restricts customisation. For any serious blog, self-hosted WordPress.org is the correct choice. See the table near the top of this guide for a full comparison.
How do I make my WordPress blog fast?
Use LiteSpeed hosting (Hostinger), configure LiteSpeed Cache with page caching and image lazy loading enabled, compress all images under 200KB before upload, pick a lightweight theme (Kadence or GeneratePress), activate Cloudflare’s free CDN, and limit plugins to essentials. Target LCP under 2.5 seconds and total mobile load time under 2 seconds.
Can I create a WordPress blog on my phone?
You can write and edit posts using the WordPress mobile app for iOS or Android. Initial hosting setup, WordPress install, and theme configuration are easier on a desktop. Do the 90-minute setup on a computer; use the mobile app for on-the-go writing after launch.
Is WordPress still worth using in 2026?
Yes — WordPress powers over 43% of all websites globally and continues to evolve with the Gutenberg block editor, full site editing, and improved performance tools. For bloggers, small businesses, and content sites, self-hosted WordPress remains the most flexible and cost-effective publishing platform available.
How do I create a blog page in WordPress (separate from the homepage)?
Go to Pages → Add New → create a blank page titled “Blog.” Then go to Settings → Reading → select “A static page” → set Posts page to “Blog.” Your blog feed now lives at yourdomain.com/blog/.
How do I create a blog section in an existing WordPress website?
Same process as above — create a blank Blog page, set it as your Posts page in Settings → Reading, then add it to your navigation menu under Appearance → Menus.
How do I create a blog post page in WordPress (the posts listing page)?
In WordPress, the “blog post page” or posts listing page is created by going to Pages → Add New → create a blank page → then assigning it as the Posts Page under Settings → Reading → A static page. WordPress automatically populates it with all your posts in reverse-chronological order.
How do I add a blog tab to my WordPress navigation menu?
Go to Appearance → Menus. In the “Pages” column on the left, find your Blog page (or any page you’ve designated as the posts page). Check the box and click “Add to Menu.” Drag it to the correct position in the menu structure. Click “Save Menu.”
How do I create a blog on WordPress.org for free?
WordPress.org software is free to download. You need paid hosting (~$35/year on Hostinger) and a domain name (~$12/year, or free with annual Hostinger hosting). There is no fully free version of self-hosted WordPress.org — the cost is hosting, not the software.
How do I create a beautiful WordPress blog from scratch?
Use a lightweight theme (Kadence or GeneratePress), set a consistent three-colour palette and two-font system in Appearance → Customize, create branded featured images in Canva at 1200×628px, and ensure your blog reads cleanly on mobile before publishing. Speed + consistency of design = beautiful in practice.
How do I create a new WordPress blog in 2026?
The same 10-step process in this guide applies whether it’s your first blog or your tenth. Sign up for Hostinger, use the one-click WordPress installer, configure Settings → Permalinks to Post Name, install six essential plugins, and publish. The technical setup takes under 90 minutes.
What’s the difference between a blog and a website on WordPress?
On WordPress, the technical difference is minimal — both use the same software. A “blog” emphasises a regularly updated stream of Posts. A “website” typically has a static homepage and uses Pages more heavily. You can run both simultaneously on one WordPress install, which is how most serious blogs operate.
How do I create a blog on a WordPress website I already have?
Create a blank “Blog” page (Pages → Add New, no content, publish), then go to Settings → Reading → set it as your Posts page. Add it to your menu. Done — your existing site now has a live blog section.
How do I create a self-hosted WordPress blog?
Self-hosted means hosting the WordPress.org software yourself. Buy hosting at Hostinger, get a domain, run the one-click WordPress install in hPanel, and follow the ten steps in this guide. “Self-hosted” is the opposite of using WordPress.com or another platform that hosts it for you.
How do I create a WordPress blog for free?
WordPress.com offers a free hosted blog with a subdomain (yourblog.wordpress.com) and restrictions on plugins, monetisation, and theme options. Self-hosted WordPress.org is not free — you need paid hosting (~$35/year). For a blog you plan to grow or monetise, self-hosted is the correct choice despite the small cost.
Can I create a WordPress blog with multiple post categories?
Yes. Go to Posts → Categories and create as many categories as you need (aim for 4–8 for a focused blog). Each post is assigned to a primary category. Category archive pages (yourdomain.com/category/your-category/) act as filtered blog feeds — useful for blogs covering multiple topics.
Final Thought: Build It, Then Improve It
Here’s what no one tells you when you’re setting up your first WordPress blog: the technical setup, which feels overwhelming at the start, takes 90 minutes. The writing, which feels easy at the start, takes years to do at a high level.
Most people obsess over the setup and underinvest in the content. Flip that ratio.
Your first 25 posts are the foundation. Get the technical setup done this week. Publish three posts within the next 30 days. By month six you’ll look back at post one and laugh at how rough it was. That’s exactly the point — the compounding only starts the day you hit Publish.
The blog you build today is the one you’ll be running in 2030, if you keep showing up.
Ready to go beyond the technical setup — into niche strategy, content planning, and monetization? Read the full guide: How to Start a Blog and Make Money in 2026
Or if you’re ready to hand off the technical side: WordPress SEO Services – Real Results from a Working SEO Expert.
